Toy Customization Guide: Personalize Toys for Unique Play

Toy Customization Guide: Personalizing Your Child’s Toys for a Unique Play Experience offers creative and practical ideas for transforming ordinary toys into personalized treasures, fostering creativity and unique play experiences for children.
Transform your child’s playtime into a unique adventure with our Toy Customization Guide: Personalizing Your Child’s Toys for a Unique Play Experience. Discover easy and creative ways to modify and personalize toys, sparking imagination and making playtime even more engaging.
Getting Started with Toy Customization
Toy customization is a fantastic way to breathe new life into old toys and create something truly special for your child. It’s about more than just changing the look of a toy; it’s about fostering creativity, problem-solving skills, and a sense of ownership. This section will guide you through the initial steps, helping you understand the basics and prepare for your first toy customization project.
Choosing the Right Toys for Customization
Not all toys are created equal when it comes to customization. Some materials and designs are more amenable to modification than others. Start by considering toys that are simple in design and made from materials like wood, plastic, or fabric, which are easy to paint, glue, or sew.
Gathering Your Supplies
Before you start, gather all the necessary supplies to ensure a smooth and enjoyable customization process. This may include paints, brushes, glue, scissors, fabric scraps, markers, and any other decorative items you plan to use. Always choose non-toxic, child-safe materials to protect your child’s health.
- Paints and Markers: Opt for acrylic paints or non-toxic markers designed for use on plastic, wood, or fabric.
- Glues and Adhesives: Select a strong, non-toxic glue suitable for the materials you’re working with.
- Fabrics and Embellishments: Scraps of fabric, beads, buttons, and stickers can add unique details to your custom toy.
Remember to always supervise children when using paints, glues, or sharp tools. Safety should be your top priority throughout the toy customization process. With the right preparation and precautions, you can create amazing personalized toys that your child will cherish.
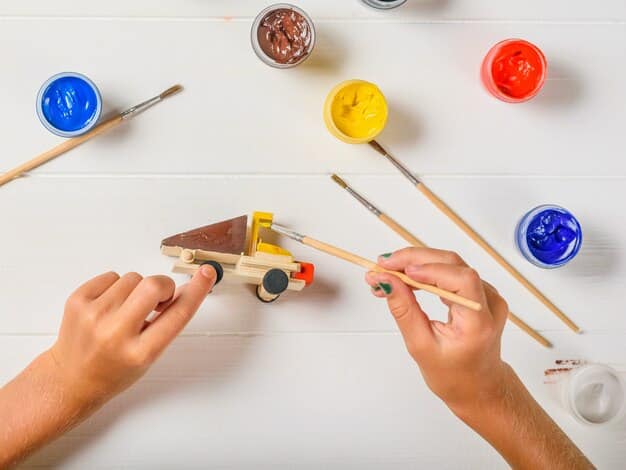
Painting and Decorating Toys
Painting and decorating are two of the most popular ways to customize toys. They allow you to completely transform the look of a toy with just a few simple changes. This section will provide tips and techniques for painting and decorating various types of toys, helping you achieve professional-looking results.
Preparing Toys for Painting
Proper preparation is crucial for achieving a smooth, even paint finish. Start by cleaning the toy thoroughly to remove any dirt, dust, or grease. For plastic toys, lightly sand the surface to create a better grip for the paint. Always use a primer before applying the final coat of paint to ensure better adhesion and color vibrancy.
Painting Techniques
There are several painting techniques you can use to customize toys, depending on the desired effect. For smooth, even coverage, use a paintbrush or a spray paint designed for plastic or wood. For more intricate designs, consider using stencils or freehand painting with fine-tipped brushes.
- Brush Painting: Use smooth, even strokes to apply the paint, avoiding thick layers that can drip or smudge.
- Spray Painting: Hold the can about 10-12 inches from the toy and apply thin, even coats, allowing each coat to dry before applying the next.
- Stenciling: Secure the stencil to the toy with tape and carefully apply the paint using a stencil brush or sponge.
Allow the paint to dry completely before adding any decorative details or assembling the toy. Consider sealing the painted surface with a clear coat of varnish to protect the paint and make the toy more durable. With the right techniques and a little patience, you can create beautifully painted and decorated toys that your child will love.
Adding Fabric and Sewing Details
Adding fabric and sewing details can transform a plain toy into a plush and cuddly companion. This section will explore different ways to incorporate fabric into toy customization, from simple no-sew projects to more advanced sewing techniques.
No-Sew Fabric Embellishments
For those who prefer not to sew, there are plenty of no-sew options for adding fabric to toys. Fabric glue, fusible webbing, and felt are all great materials for creating quick and easy embellishments. You can cut out shapes, add patches, or create fabric overlays to change the look of a toy without ever picking up a needle.
Basic Sewing Techniques for Toys
If you’re comfortable with basic sewing, you can create more intricate fabric details for your custom toys. Simple stitches like running stitch, backstitch, and blanket stitch can be used to add seams, attach embellishments, or create new outfits for dolls and stuffed animals.
- Appliqué: Cut out fabric shapes and sew them onto the toy using a blanket stitch or a zigzag stitch.
- Embroidery: Use embroidery floss to add decorative stitches and designs to the fabric.
- Creating Outfits: Design and sew simple outfits for dolls or stuffed animals using basic sewing patterns.
When working with fabric, always choose soft, durable materials that are easy to clean. Consider using recycled fabrics or scraps from other projects to reduce waste and add a unique touch to your custom toys. With a little creativity and some basic sewing skills, you can create amazing fabric-based transformations that will delight your child.
Repurposing and Upcycling Old Toys
Repurposing and upcycling old toys is a fantastic way to reduce waste and create something new and exciting. This section will explore creative ideas for transforming old, unwanted toys into unique and imaginative creations. It’s an eco-friendly way to engage in toy customization and give old items a new life.
Transforming Plastic Toys
Plastic toys can be transformed into a variety of new items, from planters to decorative objects. Cut off parts of the toy and use it to create a new shape, then paint and decorate it as desired. Plastic toys can also be melted down and reshaped into new forms using a heat gun or oven.
Giving New Life to Wooden Toys
Wooden toys can be sanded down, repainted, and reconfigured to create completely new designs. Wooden blocks can be used to build new structures, and wooden figurines can be transformed with paint and fabric scraps.
- Creating Toy Mobiles: Suspend small repurposed toys from a mobile frame to create a unique and engaging decoration for a child’s room.
- Building Toy Sculptures: Glue or weld together various repurposed toys to create a whimsical sculpture.
- Making Toy Jewelry: Turn small toy parts into beads or pendants for a unique and personalized jewelry piece.
Remember to always prioritize safety when repurposing old toys. Remove any sharp edges, loose parts, or toxic materials before giving the transformed toy to a child. With a little imagination and some basic crafting skills, you can create amazing new toys from old materials, reducing waste and fostering creativity.
Adding Electronics and Sound Effects
Adding electronics and sound effects can take your toy customization to the next level, creating interactive and engaging play experiences. This section will explore how to incorporate simple electronic components into your custom toys, bringing them to life with lights, sounds, and motion.
Simple Electronic Components for Toys
There are several simple electronic components that can be easily added to toys, including LEDs, buzzers, and small motors. These components can be purchased online or at electronics stores and are relatively easy to wire and connect.
Incorporating Sound Effects
Adding sound effects to toys can make them even more engaging and fun. You can use small sound modules that play pre-recorded sounds or create your own custom sound effects using a simple audio recorder.
- Adding Lights: Install LEDs in the toy to create glowing eyes, flashing lights, or illuminated details.
- Creating Motion: Attach a small motor to the toy to make it move, spin, or vibrate.
- Integrating Sound: Wire a sound module to the toy to play sound effects when triggered by a button or sensor.
When working with electronics, always use low-voltage components and follow safety precautions to avoid electrical shocks or fire hazards. Supervise children closely when they are playing with toys that contain electronic components. With a little knowledge and some simple electronics, you can create amazing interactive toys that will captivate your child’s imagination.
Safety Considerations and Best Practices
Safety should always be your top priority when customizing toys. This section will outline important safety considerations and best practices to ensure that your custom toys are safe for children to play with.
Choosing Safe Materials
Always choose non-toxic, child-safe materials for toy customization. Look for paints, glues, and fabrics that are labeled as non-toxic and suitable for use by children. Avoid using materials that contain lead, phthalates, or other harmful chemicals.
Ensuring Toy Durability
Make sure that your custom toys are durable and can withstand rough play. Securely attach any embellishments, and use strong adhesives to prevent small parts from coming loose. Check the toys regularly for any signs of wear and tear, and repair or replace them as needed.
- Avoiding Small Parts: Avoid using small parts that could pose a choking hazard for young children.
- Securing Embellishments: Use strong adhesives or stitches to securely attach any embellishments to the toy.
- Regular Inspections: Regularly inspect the toy for any signs of damage or wear, and repair or replace it as needed.
Always supervise children when they are playing with custom toys, and teach them how to handle the toys safely. By following these safety considerations and best practices, you can create amazing custom toys that are both fun and safe for your child to enjoy.
| Key Point | Brief Description |
|---|---|
| 🎨 Painting Toys | Transform toys with non-toxic paints and various techniques. |
| 🧵 Fabric Details | Add fabric using no-sew or basic sewing methods. |
| ♻️ Repurposing | Give old toys new life by repurposing them creatively. |
| 💡 Electronics | Add lights or sound effects for interactive play. |
FAQ
▼
Toys made of wood, plastic, or fabric are generally best for customization. These materials are easy to paint, glue, or sew, allowing for a wide range of creative modifications.
▼
Use non-toxic acrylic paints for the best results. They adhere well to most surfaces and are safe for children. Always apply a primer first for better adhesion and color vibrancy.
▼
You can use fabric glue, fusible webbing, or felt to add fabric embellishments without sewing. These materials are great for creating quick and easy designs on toys.
▼
Always use non-toxic materials, avoid small parts that could be a choking hazard, and ensure all embellishments are securely attached. Supervise children during play and regularly check toys for wear and tear.
▼
Use strong adhesives, apply a clear coat of varnish over painted surfaces, and regularly inspect the toys for damage. Reinforce seams and attachments as needed to ensure they withstand rough play.
Conclusion
Transforming ordinary toys into personalized treasures is a rewarding experience that sparks creativity and imagination. By following this Toy Customization Guide, you can create unique play experiences for your child, fostering their development and making playtime even more special. From painting and decorating to adding fabric details and repurposing old toys, the possibilities are endless.


